Build a Serverless Hugo Blog on AWS for $0.50 per month
This post assumes you already have some familiarity with Hugo for building a blog, and you have set up a free-tier AWS account. You don’t have to be an expert at either Hugo or AWS to follow along with the guide below. Really the only requirement is that you’re able to follow the Hugo quick start guide.
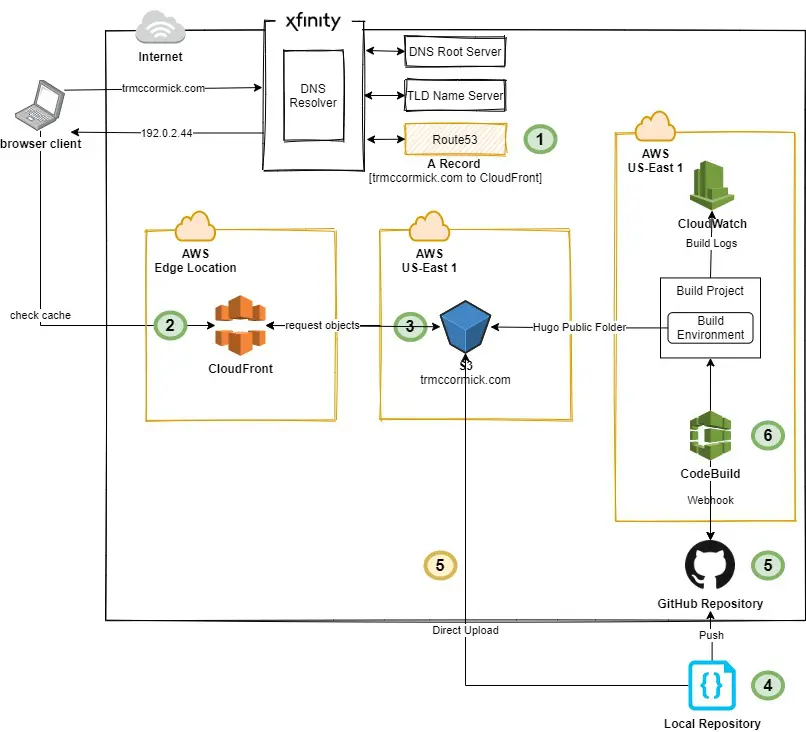
Below is an AWS architecture diagram I created using diagrams.net, the free version of draw.io. This diagram visualizes how my website runs for just $0.50 a month (exc;uding the $12/year domain name registration). While making this, I was a little fuzzy on how Route53 actually worked, so I included some additional detail on how it interfaces with an example ISP. Here are the main steps I’ll talk about in this diagram:
- Route53 – registering a domain, validating it, and routing traffic to Cloudfront
- Cloudfront – mapping your S3 bucket endpoint
- S3 – hosting your blog as a static website
- Your Code – generating a Hugo blog
- GitHub – hosting your code
- CodeBuild – building your Hugo site (CI/CD)

Route53
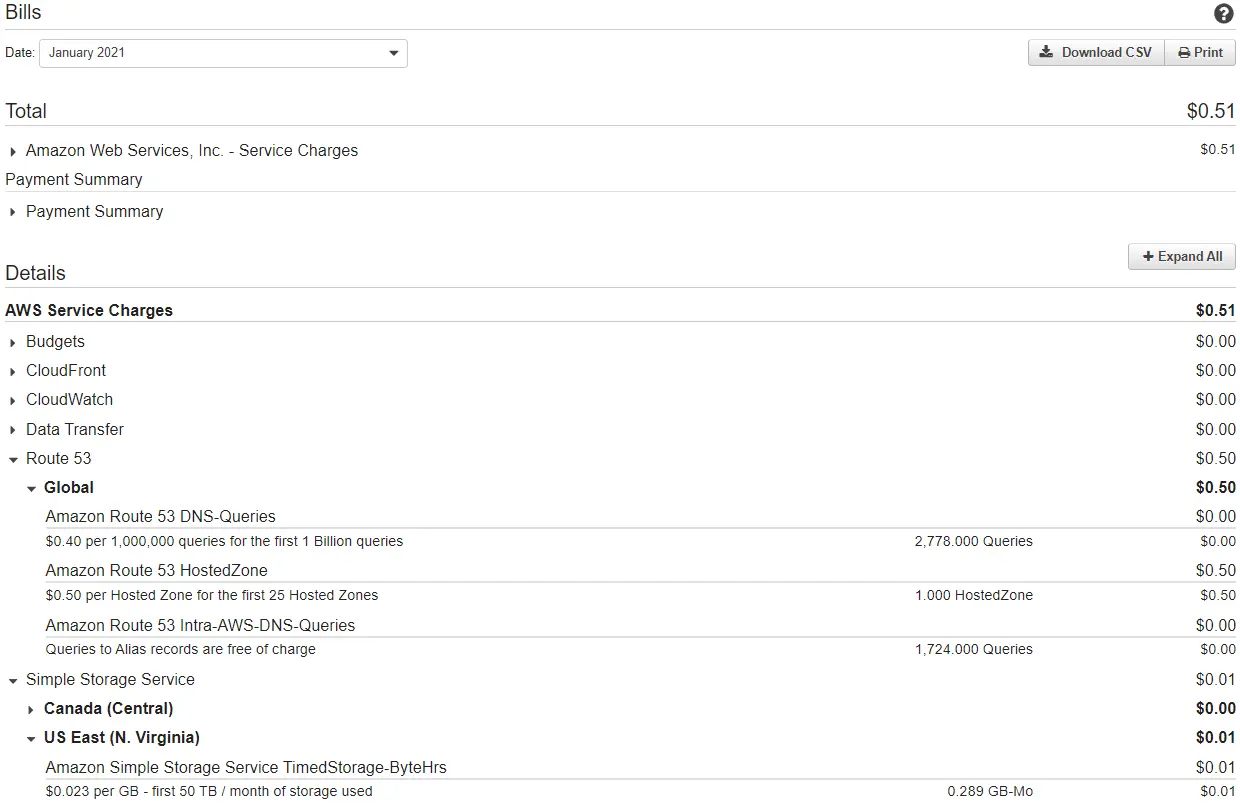
I pay $0.50 per month for one hosted zone on Route53. AWS actually created this hosted zone for me when I purchased my domain through Route53.
- Once you purchase a domain, you need to obtain the SSL/TLS certificate through ACM to identify the site over the Internet. Here is exactly how you do that.
So far you should have 2 DNS records set up from Route53 (NS, SOA) and 1 or more records set up from ACM (CNAMEs). Later you’ll add an A record to route traffic to your Cloudfront distribution for each CNAME record. If you’re interested in the piece of the diagram focused on connecting to the Internet and the relationship between ISPs and Route53, I learned a lot from How internet traffic is routed to your website or web application.
Cloudfront
Cloudfront speeds up website load times by storing the build assets at edge locations close to people viewing your blog.
- AWS wants you to select the Origin Domain Name from a dropdown, but you’ll want to paste in the actual endpoint to your s3 bucket that contains your Hugo build. For example, mine is http://trmccormick.com.s3-website.us-east-2.amazonaws.com/.
- You’ll be able to leave a lot of the settings in Cloudfront to their defaults. I chose to use automatic object compression, and I changed the price class so that I’m only using edge locations in North America.
- You’ll want to map your domain name(s) in the section “Alternate Domain Names (CNAMES).” I have two: trmccormick.com and www.trmccormick.com, so I just need to go to Route53 and grab those values.
- Once your distribution has been created and is successfully deployed, you’ll see a Cloudfront distribution for each domain name you added in the last bullet point. In the Route53 section, I mentioned you’ll want to add A records for these Cloudfront domain names. So go over to Route53 and do that so users are re-routed from your domain to a Cloudfront location closest to them.
S3
S3 is super easy to figure out: you just upload your /public/ folder that Hugo builds when you run hugo -D on your local machine.
- Create an s3 bucket with the name of your website (or whatever name you want, actually)
- Make the entire bucket public. Easiest way to do this is to go to the Permissions section of your S3 bucket and edit the Bucket Policy to look like the following, replacing your bucket name with mine:
|
|
- Finally upload your /public/ folder created from your local machine
If you’ve followed the steps, your blog should start appearing when you visit your domain. It should score pretty highly on Google Page Speed Insights for several reasons. If you go to that site and type in your domain, you’ll see why your website is fast, and how you might be able to speed it up even further.
Each time you make any changes to your Hugo site, you’d need to overwrite all of the files in your S3 bucket. That’s fine if you want to keep it pretty simple. If you’re creating a lot of content or making frequent changes to your Hugo site, you probably want to work through the next sections that help you automate that task using GitHub and CodeBuild.
Hugo
I won’t tell you how you should organize your Hugo build, but there is one specific thing you’ll need to add into your git repository: a build spec. This is basically an instructions file. With CodeBuild, you’ll be telling a fresh computer how to build your site. There will be modules it needs to install, files it needs to build, and it will need to know what to do with the files it builds. Below is my buildspec.yml file in the root directory of my code repository.
|
|
Three things to note here:
- We’re using commands
yum installbecause we’ll be using AWS Linux as our environment machine in CodeBuild. If you run into trouble here, it’s because you’ve selected a different build environment in CodeBuild. - You’ll want to change the s3:// location to reflect your bucket name. This line sends the contents inside of the /public/ folder from your build environment to your s3 bucket, deleting whatever is currently in the bucket.
- You’ll need to create a Cloudfront invalidation across the edge locations where your site has been downloaded. This basically just means you’re clearing everyone’s cache right now, instead of waiting for the cache to expire.
GitHub
If you’ve never used GitHub, it’s super simple to set up. You’ll create an account, set up a new repository (name it something creative like… blog). I’ll let GitHub explain the rest.
CodeBuild
In CodeBuild, you’re able to set up a webhook to your GitHub repository, which essentially means GitHub is sending a notifcation to CodeBuild every time code is pushed to the main branch.
- First, configure your Source to be your GitHub repository.
- Second, change your Environment OS to Amazon Linux 2. It can be a standard runtime with the most recent image.
- Third, you’ll want to create a new service role. More on that in a second.
- Last, you probably want to activate CloudWatch logs so you can see log output of the build. This is necessary for debugging. You’ll be able to quickly isolate problems and fix them in AWS or in your buildspec.
Okay back to the service role. CodeBuild needs to work with s3 and Cloudfront, so you’ll have to go to IAM and attach two new policies to this role:
- The first policy is related to s3. You’ll see in the
buildspec.ymlfile that we’re executing the S3 sync command with the AWS CLI. Your bucket policy already has public read access, but you need to make a policy that gives access to delete objects from that bucket. Here is what my json looks like:
|
|
- The second policy is related to Cloudfront. In the
buildspec.ymlfile, we created a Cloudfront invaldation, so we’ll need to give access to CodeBuild to be able to execute that. Change your resource to your Cloudfront distribution ARN and you should be all set. Here is the json for that policy:
|
|
That’s it, now you should be able to push code to your GitHub repo and CodeBuild will run through the buildspec, and your site should reflect changes in just a matter of minutes. I’ve been running my website since 2019 using this serverless strategy. Here is a picture of my monthly bill. I’ll probably always stay near $0.51 per month.

Thanks for reading!